Features and Navigation
In this article, I am introducing the various views of xltrail with their features.
Landing Page
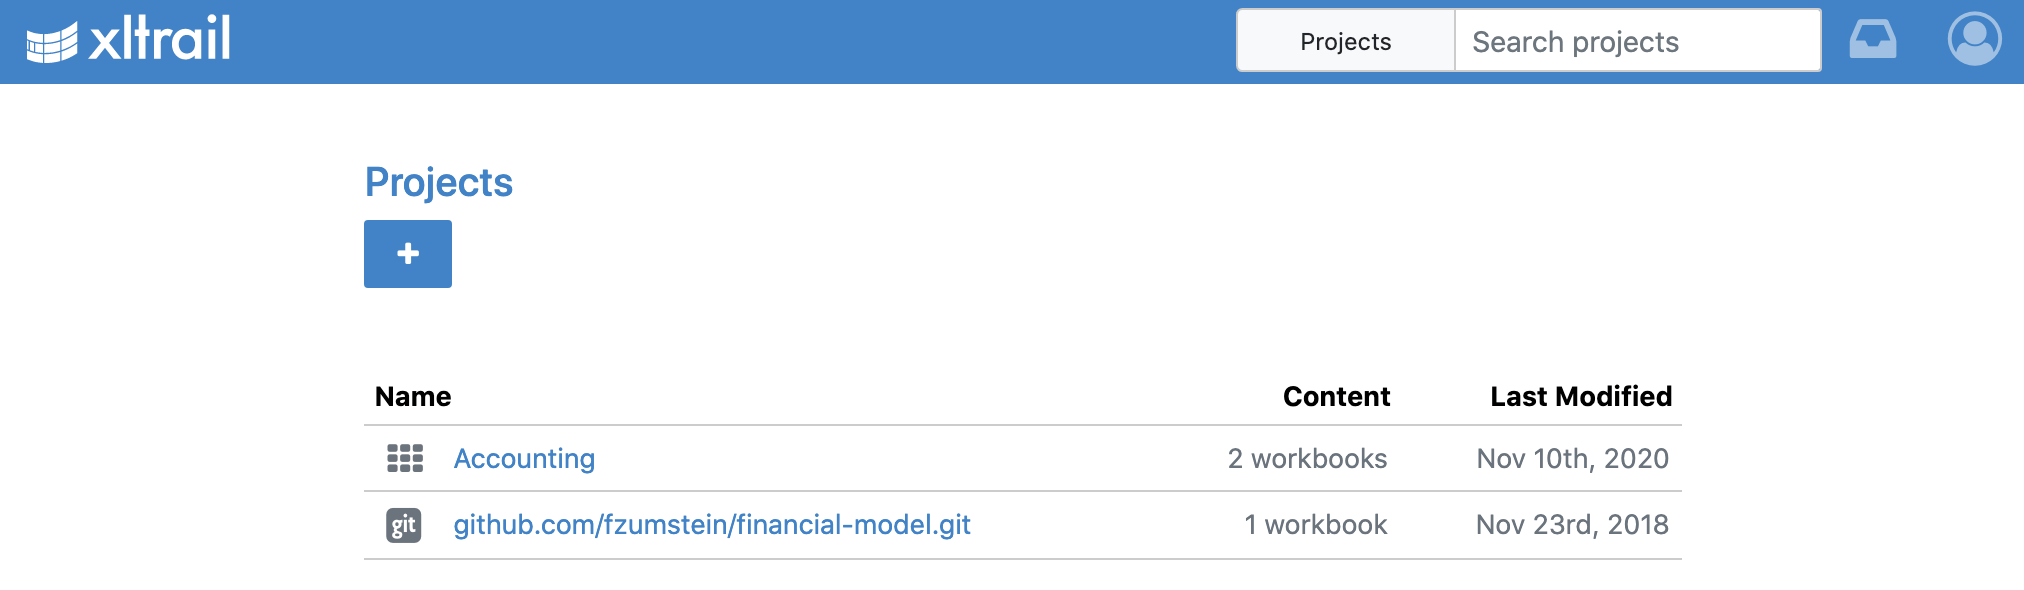
On the landing page, you can:
- Add new projects by clicking the
+ New Projectbutton. - See all your projects (drag-and-drop and Git).
- Search for projects in the search box on the top.
- Click on the user icon on the top-right to access the Settings (requires the
adminuser role). - By clicking on the xltrail logo on the top left, you can always come back to this page from anywhere in xltrail.
Clicking on one of the projects brings you to the Project View.
Project View
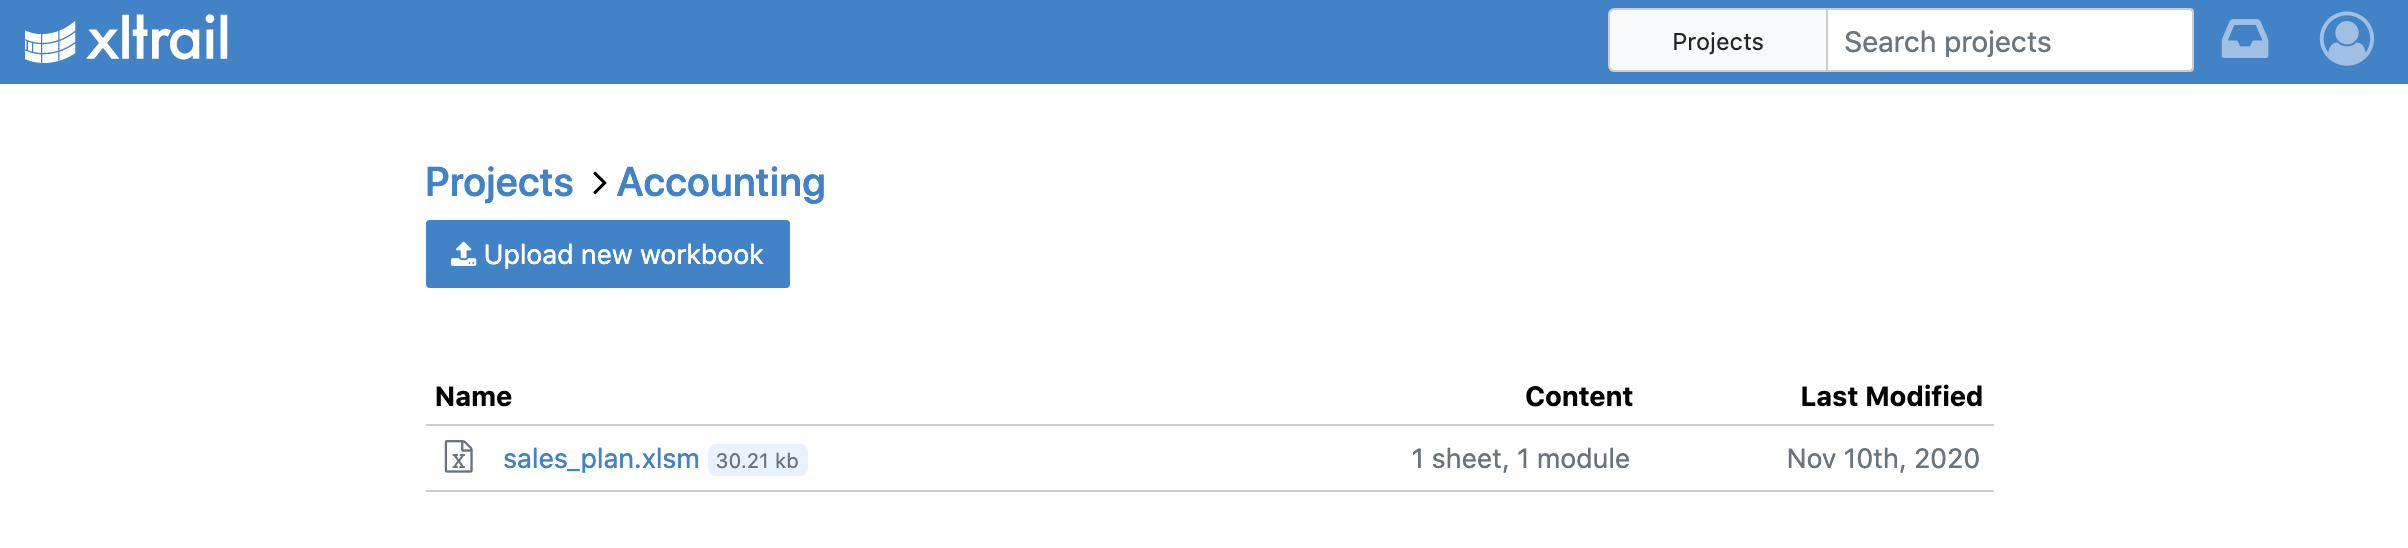
- The Project view shows all the Excel files that are part of a project.
- This is where you can
Upload new filesthat you want to start tracking. - Project view displays all Excel workbooks in a structured format for easy management.
- Users can open any Excel file in the Workbook View to edit, view changes, and track versions.
- The
Addmenu provides two options:Upload Workbookto thecurrent directoryandAdd to New Directory. - Users can choose to add content in the same branch or create a new branch.
- To the left of the Commit Summary, there is a
Download buttonthat allows you to download the latest version of the workbook. - To the left of the Add button, there is a Settings button that gives you access to the Project Settings.
- The active branch is highlighted in bold for easy identification.
- Allows users to create, switch, and commit updates between branches.
- The upload process automatically adds new file versions within the same branch.
- Malware scan runs automatically on all uploaded files for security.
- Password-protected workbooks are supported.
- The upload interface has been visually improved for clarity and ease of use.
- Breadcrumb-style navigation enables quick movement between folders.
Clicking on an Excel file opens the Workbook View for detailed access and tracking.
Workbook View
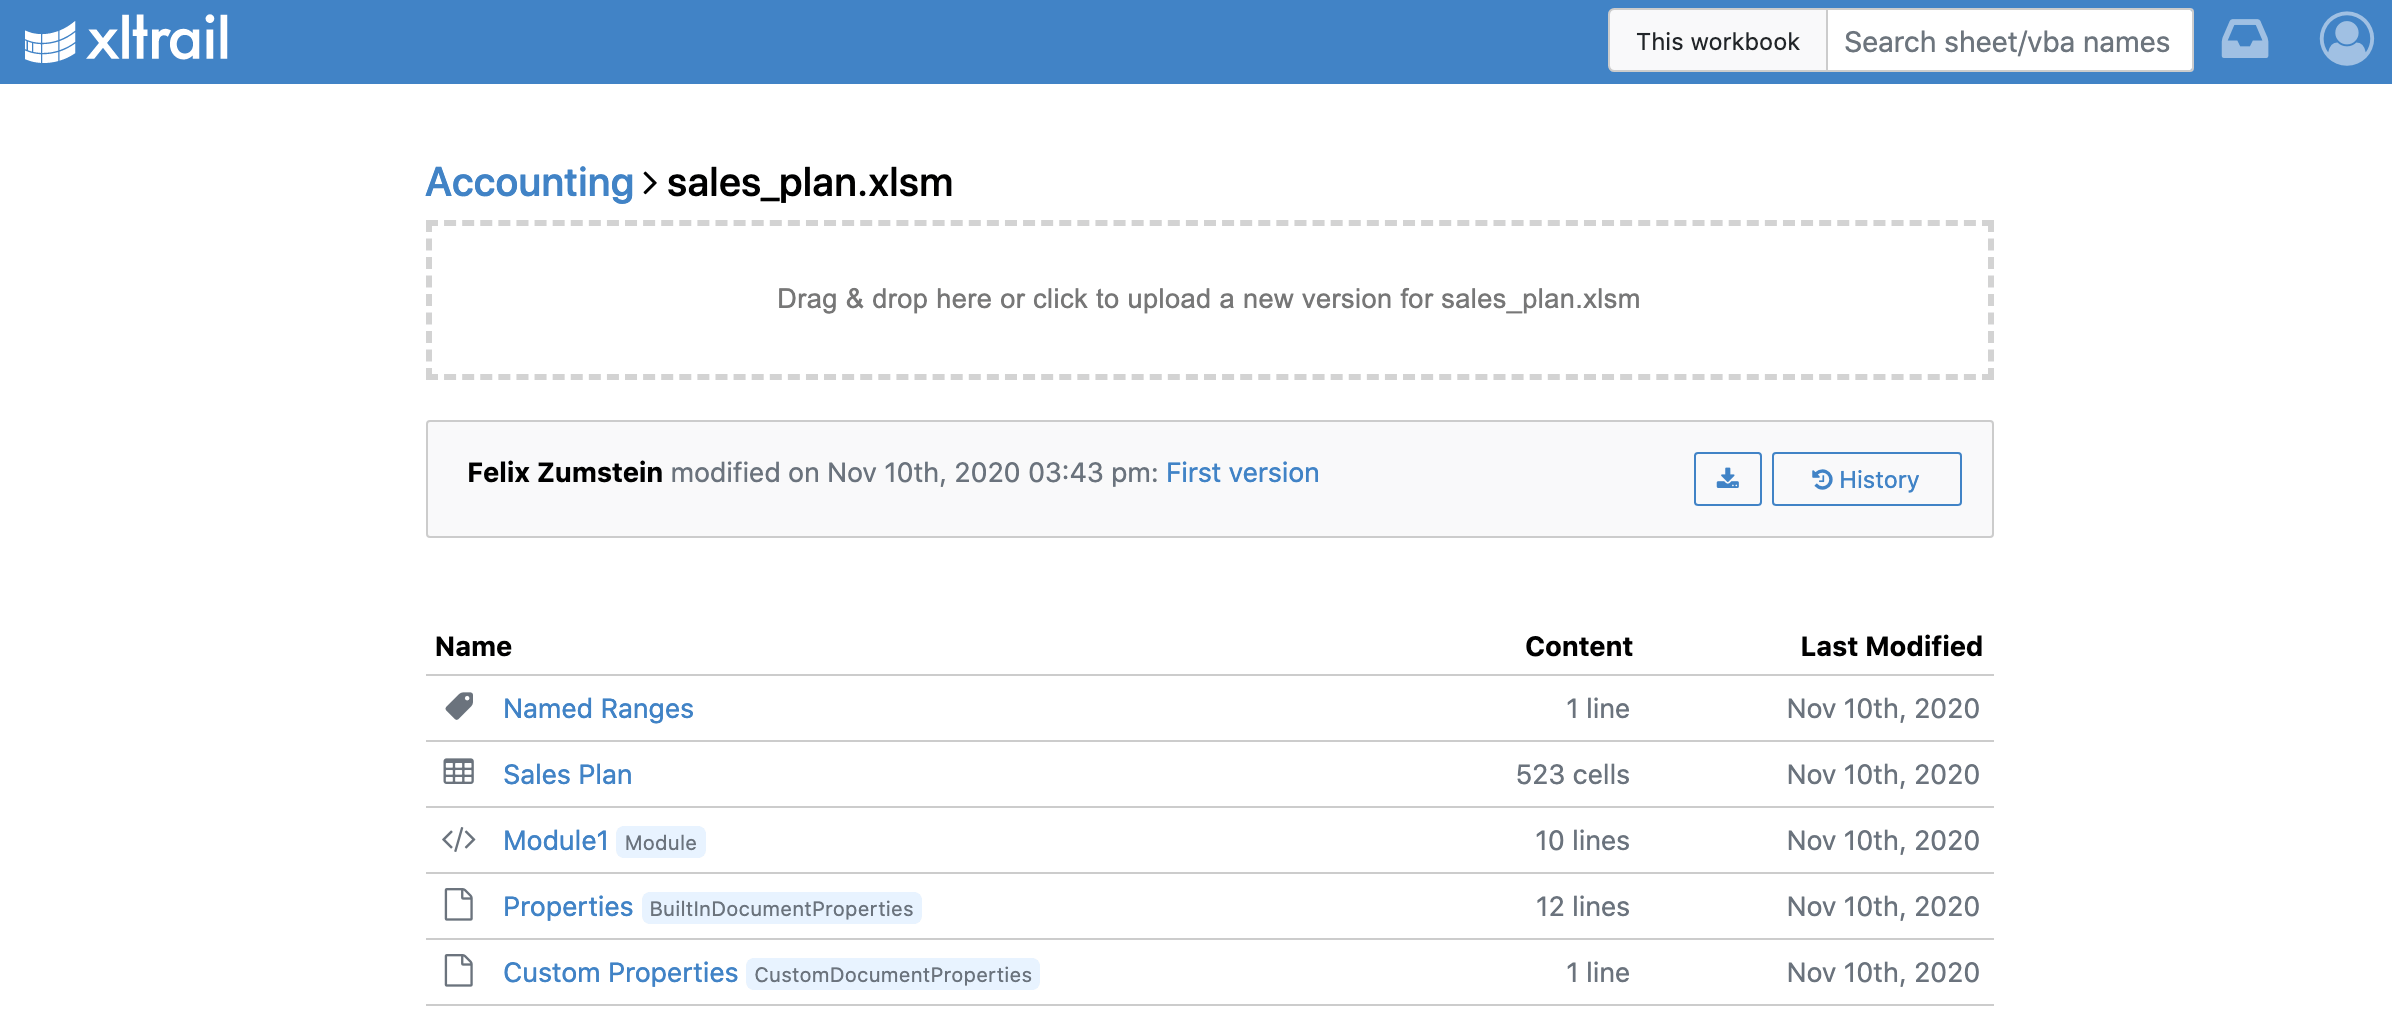
- The workbook view gives you access to all components that are tracked by xltrail.
- Click the
Editbutton to access theUpload New Versioninterface. This interface allows users to upload a new version of the file. - The commit box gives you a summary of the latest change and allows you to click on the change message to see a summary of the changes (First version in the screenshot).
- By clicking the
Historybutton in the commit box, you will get to the History View. - To the left of the
Historybutton, you'll see the download button from where you can download the latest version of the workbook.
Click on one of the components to get to the content view.
Component View
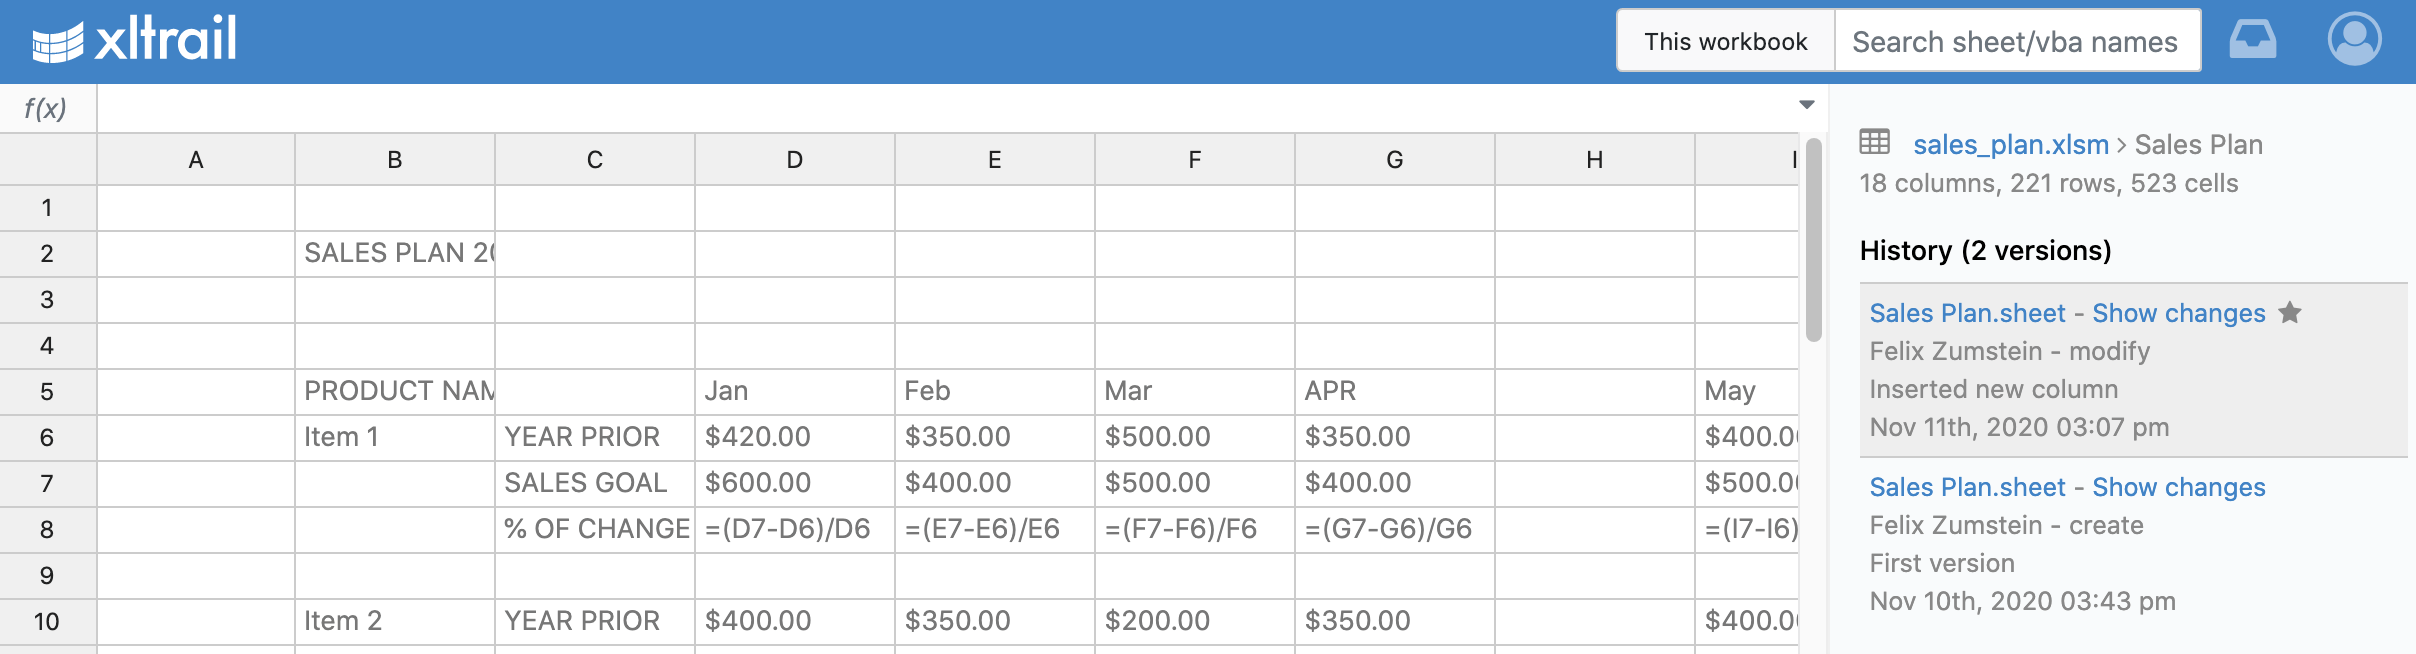
- This view will differ depending on whether you are looking at a sheet (like in the screenshot) or a text based component like VBA code or named ranges.
- On the right-hand side, you will see a sidebar with the history of just those versions that changed the component you are looking at. This is different from the History View that will show all versions that changed any component of the file.
- To see a long formula, you can click on the cell to make it appear in the formula bar. You can also click on the expand icon at the right end of the formula bar to make it bigger.
- You can right-click on the cells to copy the content.
- Clicking on
Excel sheetin the sidebar will show you the content of that version. - Clicking on
Show changesin the sidebar will show you the changes between the selected and the previous versions.
Share URLs
After selecting a cell or a range of cells, you can copy the URL and send it to your collaborators—when they click on the link, they will have the same range selected. This makes it easy to talk about a specific cell by chat or email. For text files like VBA modules, it works the same: you can click on a line number to select it.
To get back to the component view, click on the file name at the top-right. Then, click on the History button to get to the History View.
History View
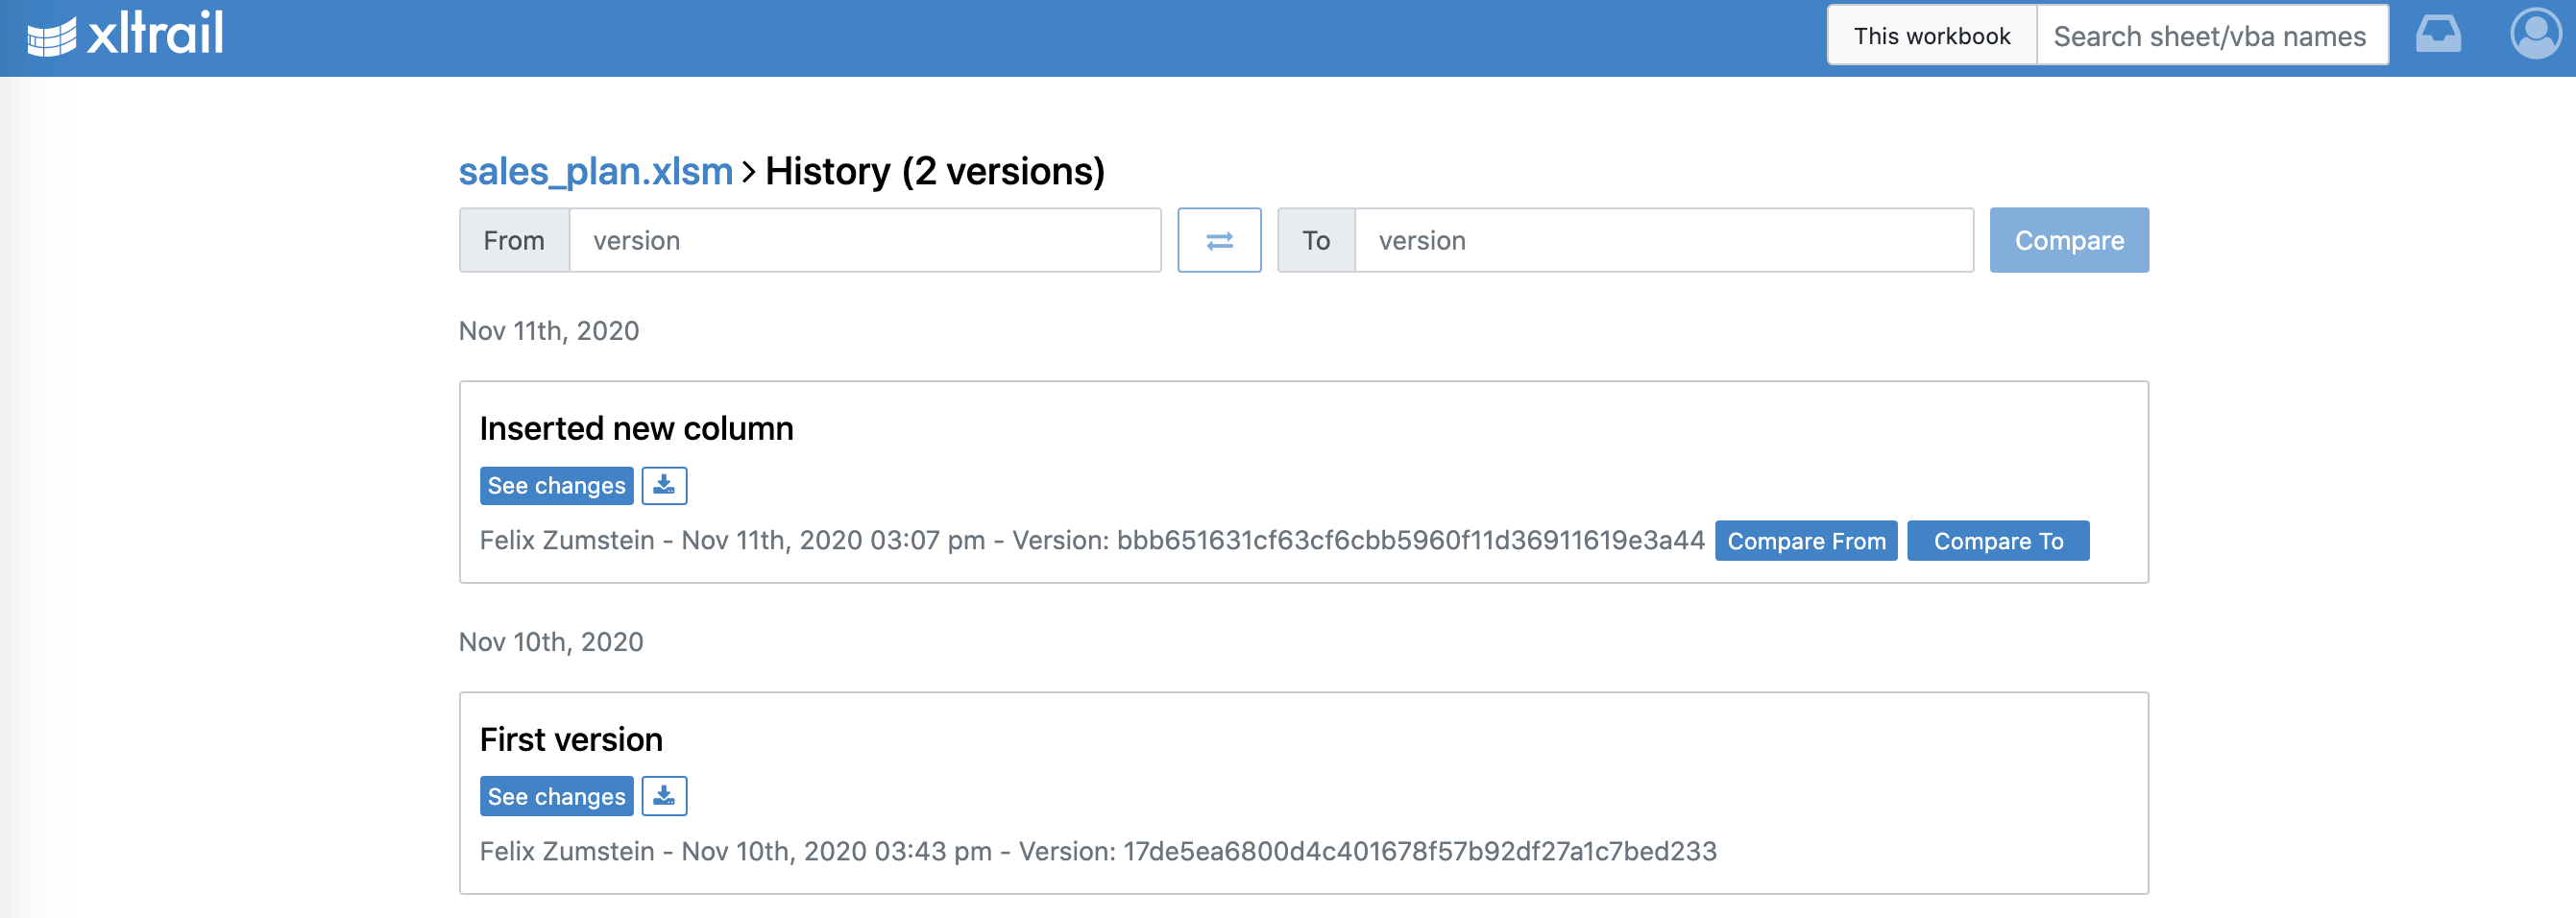
- On the History View, you'll see all versions of this file. Every version offers you two buttons:
See changesand a download button to the right of it (this downloads this specific version of the Excel file). - When you hover over a version, you will also see two additional buttons as shown on the screenshot:
Compare FromandCompare To. This allows you to easily compare any two versions of your history. For example, when you come back from a vacation, simply hover over the last version from before your vaction and click onCompare From, then hover over the latest version and selectCompare To: this will copy the respective version number into theFromandToboxes at the top of the page. Now you can click theComparebutton which will bring you to the Change View. - When you use a Git Project, you will be able to compare across branches: clicking into the
Frombox will allow you to select the branch from a dropdown—same for theTobox. After selecting the two branches, click onCompareto see a comparison of the latest commits of each branch.
Workbook History vs. Component History
The History View gives you every version of the workbook, while the Component View only shows you those versions that changed that specific component. If you want to know when an error got introduced into a specific sheet, it's easier to look at the history in the Component View as you usually have less versions to look at. If you are looking for an error that happened recently but you have no idea because of what, it's easier to start at the History View as you can easily access the change view from there showing you what components changed with that version.
Change View
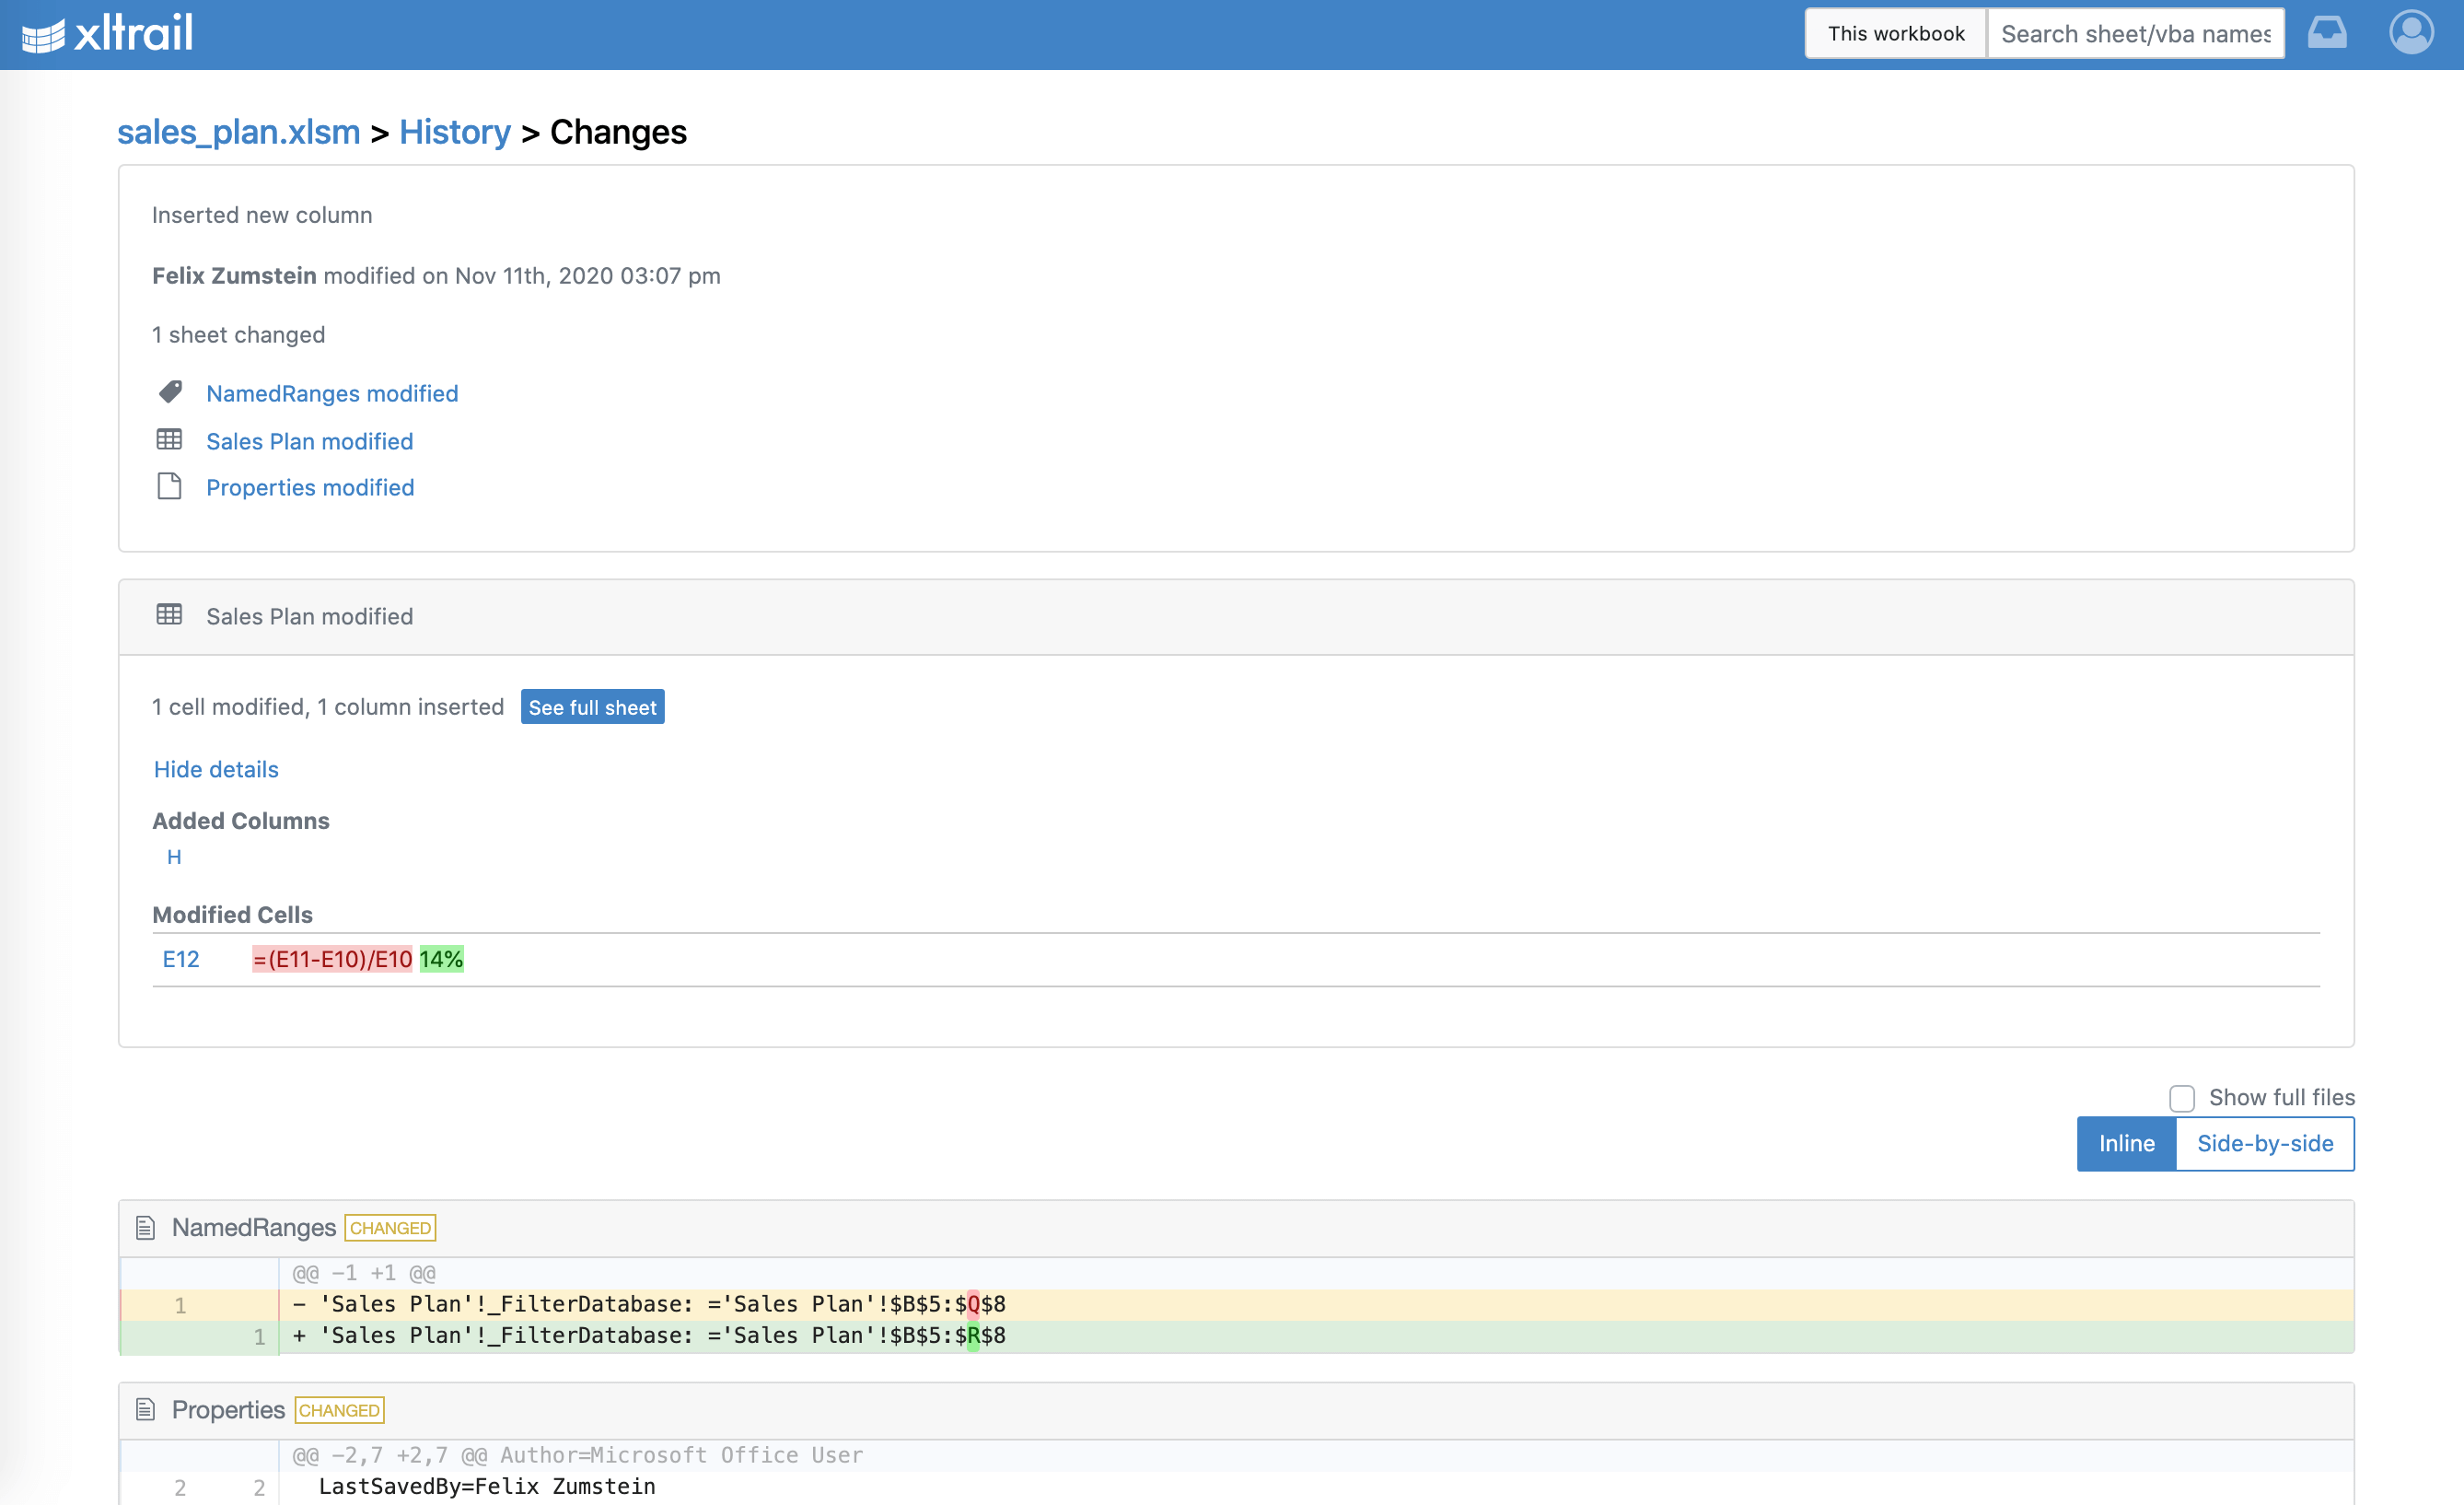
- Green means new/inserted, red means old/deleted.
- The change view shows you on a single page what changed in between two versions of your Excel file.
- If you have a lot of single cell changes, they are hidden by default and you will need to click on
Show Detailsfirst. - Since it's often easier to make sense out of cell changes when you see them in the context of the whole sheet, you can click on
See full sheetto see the changes in the Sheet Diff view. - You can activate the checkbox
Show full filesto see the entire text files, not just the area around the changes. - You can change the view of the text files between
InlineandSide-by-side.
Click on See full sheet to get to the Sheet Diff View.
Sheet Diff View
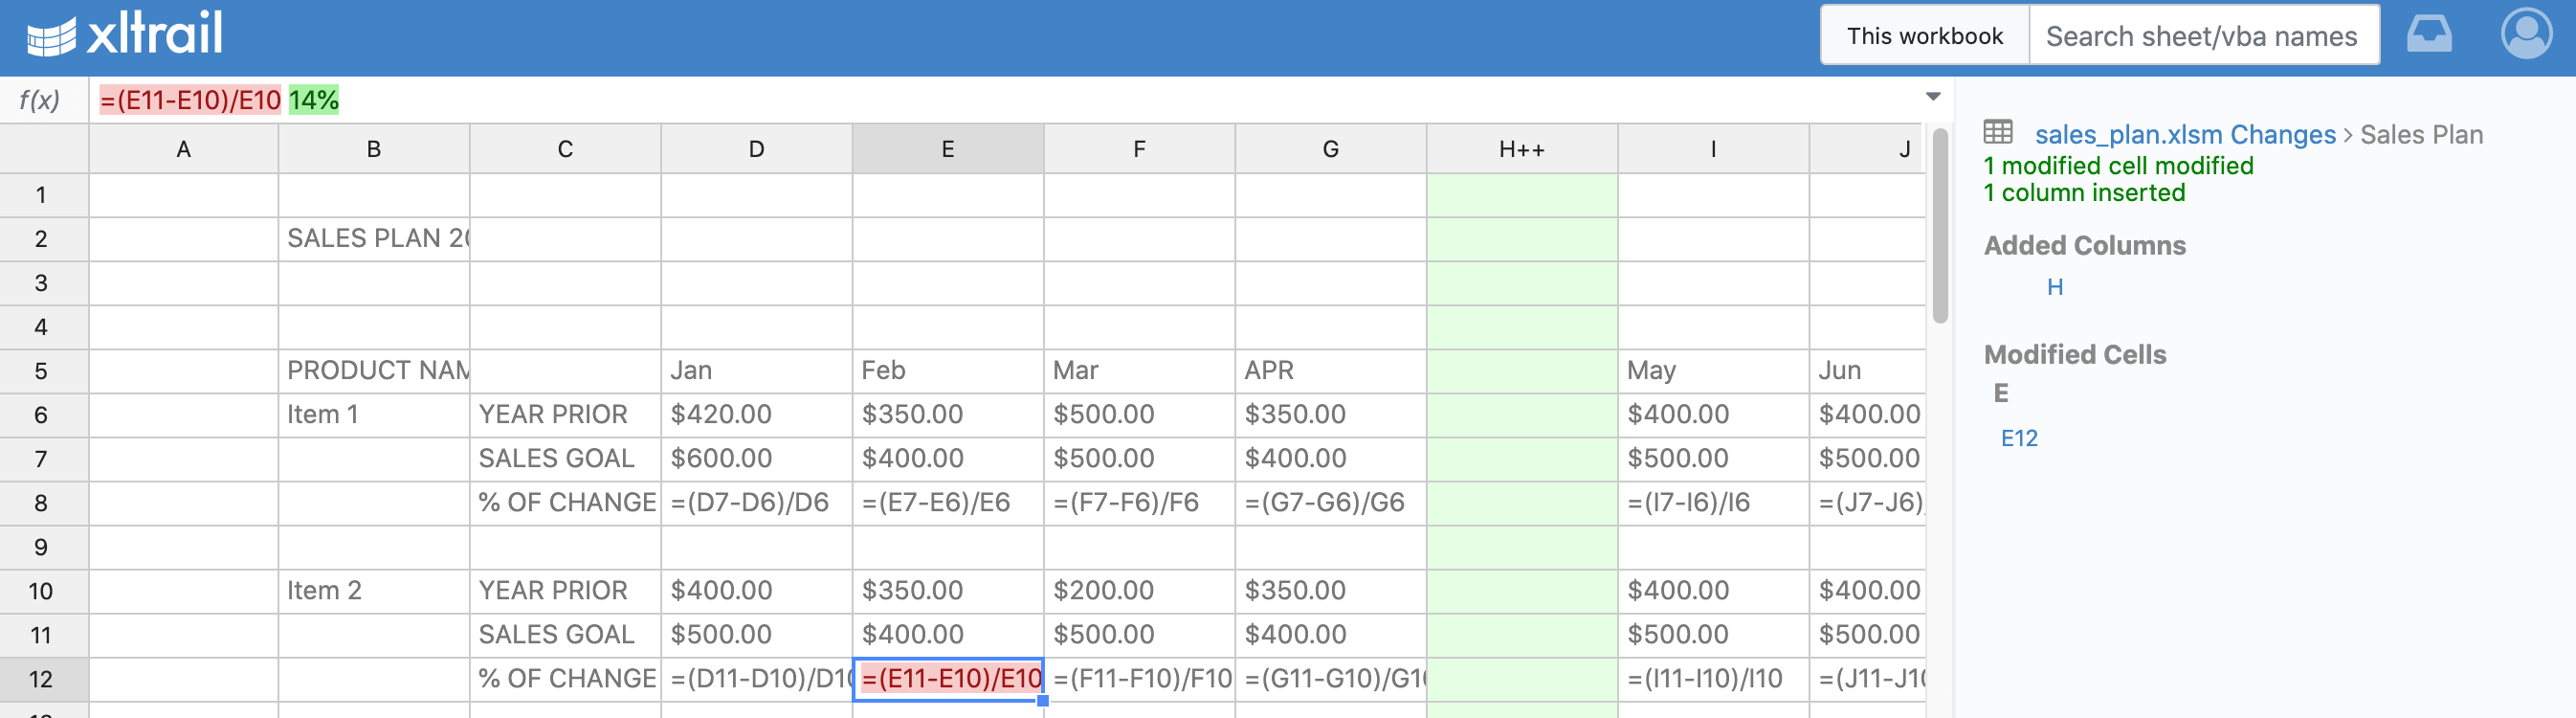
- You can navigate between the changes by clicking on the links in the sidebar on the right-hand side.
- Click on the file name on the top right to get back to the previous view.