Last updated on August 17, 2019
How to merge Excel workbooks with Git
Posted by Felix Zumstein - Comments
Git is generally known to have a bit of a learning curve. For many, using and merging branches may already be on the list of advanced topics. But even if you are fluent with using branches and merging them, the fun usually stops when Git gives you this message: Automatic merge failed; fix conflicts and then commit the result. If you use Git to track Excel files (which Git treats as binary files), you’ll almost always end up in such a conflict when merging two branches.
This post gives you a rundown on Git branches and when and why Excel files cause merge conflicts before showing you how to resolve such merge conflicts.
Table of Contents
- Branches
- Merging without conflicts: Jackpot!
- Merge conflicts
- How to resolve merge conflicts with Excel files
- Summary
Branches
This section is teaching you the bare minimum about Git branches. Branches are an ideal way to keep development work separated from master. In an ideal world, you’ll only merge a branch back to master when it’s actually working, tested, peer reviewed and documented (yes, we’re setting the bar high…).
Branches also form the basis for “pull requests” (GitLab calls them “merge requests”), a powerful tool supported by all major Git providers that enables an easy peer review and approval process before merging a branch back into master. Note that for simplicity, I’ll always be referring to “merging a branch back into master”, but in reality, the concepts apply to merging any two branches.
It’s always good to start with git status to see where we are:
C:\myrepo (master)> git status
On branch master
Your branch is up to date with 'origin/master'.

nothing to commit, working tree clean
By default, we are on branch master. The following command is a shortcut to create a new branch and at the same time switch to that branch, all in one command:
C:\myrepo (master)> git checkout -b mybranch
Switched to a new branch 'mybranch'

C:\myrepo (mybranch)>
You can now do your changes while you are on mybranch and run the usual git add/git commit commands. Only when you push your branch for the very first time, you should include the -u (upstream) switch to make sure your local branch is tracking the upstream (so you can do a git pull going forward):
C:\myrepo (mybranch)> git add .
C:\myrepo (mybranch)> git commit -m "my commit message"
C:\myrepo (mybranch)> git push -u origin mybranch
To switch back to master again, simply do a checkout:
C:\myrepo (mybranch)> git checkout master
Switched to branch 'master'
Your branch is up to date with 'origin/master'.

C:\myrepo (master)>
Want to switch again to mybranch? Simply do git checkout mybranch. As the branch already exists, we don’t need the -b switch anymore.
Merging without conflicts: Jackpot!
When you merge your feature branch back into master, there is one lucky situation that will never cause a merge conflict: When master has not diverged. This means that master doesn’t have any new commits since you branched off your feature branch. In such a situation, Git would perform a so called fast-forward merge by default, i.e. Git does not create a separate merge commit if not being told so explicitly.
When looking at the commit graph, this is how it looks before the merge:

To merge this branch into master, first checkout master:
C:\myrepo (mybranch)> git checkout master
Switched to branch 'master'
Your branch is up-to-date with 'origin/master'.

C:\myrepo (master)>
then merge in the branch and Git will let you know that it made a Fast-forward merge:
C:\myrepo (master)> git merge mybranch
Updating a137de5..c43ceef
Fast-forward
 contact_list.xlsm | Bin 29668 -> 9359 bytes
 1 file changed, 0 insertions(+), 0 deletions(-)
Merge conflicts
If master contains commits that are not present on mybranch, Git cannot do a fast-forward merge anymore and therefore will create a merge commit. Here is the commit graph that shows master with one additional commit since you branched off mybranch:

Text files
When you work with text files, Git will try to automatically merge the contents of the files and you only end up in a merge conflict when the very same text line has been changed on both master and your branch. Hence, if you write source code and don’t change the same files or lines of code as your colleagues all the time, you typically don’t end up with merge conflicts all that often.
Excel files
However, when you work with Excel files, Git will always give you a merge conflict when you merge your branch into master while master has new commits that are not present in your branch!
To Git, Excel files are just binary files and hence it doesn’t know how to properly merge their contents, thereby forcing a merge conflict every time (even if you just re-saved your file on master without even changing any of the content).
Note that master can have commits not present on your branch either because you or somebody else committed directly to master or because somebody merged their branch before you.
Merge conflicts with a single user and a single branch
To end up in a merge conflict, you don’t even need to work with multiple branches or collaborators. With Excel files, it’s indeed common to end up in a merge conflict even if you only use master and are the only person working on the repository.
As soon as you clone your repository into two different locations on the same computer or on two different computers (at work and at home, for example) you need to watch out.
When you commit a change on your local repository at home before pulling all commits from remote (with the changes that you pushed during your day at the office), you’ll end up with a merge conflict when you do a git pull as this command actually does two things: It (1) fetches the changes from the remote and (2) merges the changes into your local branch.
How to resolve merge conflicts with Excel files
From here, we’re going to work with the Git repository that has two branches: master and mybranch.
Our sample file contact_list.xlsm changed on both master and mybranch. Now, let’s see what happens when we try to merge mybranch into master.
First, let’s make sure that we are on master and that we are up to date with the remote:
C:\myrepo (master)> git checkout master
C:\myrepo (master)> git pull
Then let’s merge mybranch into master:
C:\myrepo (master)> git merge mybranch
warning: Cannot merge binary files: contact_list.xlsm (HEAD vs. mybranch)
Auto-merging contact_list.xlsm
CONFLICT (content): Merge conflict in contact_list.xlsm
Automatic merge failed; fix conflicts and then commit the result.
At this point I’d like to introduce the very helpful command:
git merge --abort
If things go south during your merge, you can abort with this simple command and your Git repo is back to how it was before the git merge mybranch command. We, however, are moving on with resolving the issue rather than aborting.
Method 1: Pick one or the other
One way to resolve the conflict is by either choosing the Excel file on mybranch or the one on master. This kind of defeats the purpose of working on multiple branches in parallel, but it’s still useful sometimes.
If you want to choose the version of your current branch (i.e. master), you can simply add and commit the file as Git leaves the file of the active branch in your working tree:
C:\myrepo (master)> git add contact_list.xlsm
C:\myrepo (master)> git commit -m "choosing contact_list.xlsm from master to resolve conflict"
If, instead, you want to take over the Excel file from mybranch, you’ll need to first check it out before adding and committing:
C:\myrepo (master)> git checkout --theirs contact_list.xlsm
C:\myrepo (master)> git add contact_list.xlsm
C:\myrepo (master)> git commit -m "choosing contact_list.xlsm from mybranch to resolve conflict"
Note that --theirs refers to the other branch, i.e. if you are on master, it refers to the branch you are merging in (mybranch). If you want to change back to the version of the file on master, simply do
C:\myrepo (master)> git checkout --ours contact_list.xlsm
before adding and committing your file.
If you had known that you wanted to keep one or the other side before actually calling the merge command, you could simplify things by doing:
C:myrepo (master)> git merge mybranch -X theirs
Auto-merging contact_list.xlsm
Merge made by the 'recursive' strategy.
 contact_list.xlsm | Bin 17565 -> 14999 bytes
 1 file changed, 0 insertions(+), 0 deletions(-)
If, instead, you want to take over the Excel file from master, simply replace -X theirs with -X ours.
Method 2: Proper (but manual) merging
Having to choose between the master or mybranch version doesn’t really encourage a multi-branch workflow, so another way to go about that is to compare the two versions of the file and take over parts from master and parts from mybranch. One convenient way of doing this is by using git mergetool. Let’s start again with the merge commands that causes a merge conflict:
C:\myrepo (master)> git merge mybranch
warning: Cannot merge binary files: contact_list.xlsm (HEAD vs. mybranch)
Auto-merging contact_list.xlsm
CONFLICT (content): Merge conflict in contact_list.xlsm
Automatic merge failed; fix conflicts and then commit the result.
Run git mergetool which will output something along these lines if you haven’t configured anything special:
C:\myrepo (master)> git mergetool

This message is displayed because 'merge.tool' is not configured.
See 'git mergetool --tool-help' or 'git help config' for more details.
'git mergetool' will now attempt to use one of the following tools:
tortoisemerge emerge vimdiff
Merging:
contact_list.xlsm

Normal merge conflict for 'contact_list.xlsm':
  {local}: modified file
  {remote}: modified file
Hit return to start merge resolution tool (vimdiff):
Now simply hit Ctrl-C which will terminate instead of trying to open the files. If you look at your folder, you have now four additional files next to contact_list.xlsm:
contact_list_BACKUP_8576.xlsm
contact_list_BASE_8576.xlsm
contact_list_LOCAL_8576.xlsm
contact_list_REMOTE_8576.xlsm
We are only interested in contact_list.xlsm (the master version), and contact_list_REMOTE_8576.xlsm (the version from mybranch). It is now easy to open both files next to each other and take over those changes you want from contact_list_REMOTE_8576.xlsm and add them to contact_list.xlsm.
Once we’re happy with the combined contact_list.xlsm, simply run the usual commands:
C:\myrepo (master)> git add contact_list.xlsm
C:\myrepo (master)> git commit -m "resolved merge conflicts"
After that, make sure to manually delete the four files again.
Comparing versions helps
Having the two files from both branches locally makes it easy to compare them with a tool like Spreadsheet Compare that helps you with taking over the relevant changes from your branch to master.
An even easier way is to setup your Git repository in xltrail: Instead of comparing local files you can simply go to History, then type master into the From box and mybranch into the To box and hit Compare. This will show you the differences across sheets/cells and VBA code nicely formatted in your web browser.

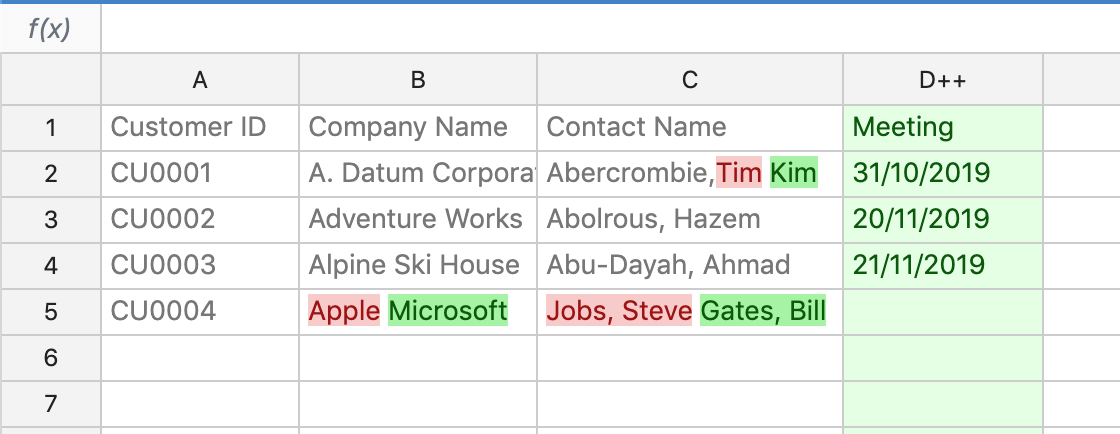
Clickig on See full sheet will give you the context of the changes:
Summary
Merging is often a challenge, even more so with Excel files as Git doesn’t understand them. Using tools like git mergetool and xltrail makes comparing across branches a lot easier, allowing for a multi-branch development process with Git and Excel files.