Git Projects
This article is about Git integrations and expects that you already have a Git repository hosted at an external Git provider like GitHub. If you'd rather learn how to set up a drag-and-drop project, head over to Drag-and-Drop Projects.
Create a Git Project
xltrail allows you to connect to external Git repos by one of the following methods:
- HTTP(S): requires a username and token
- SSH: requires an ssh key
The following points help you to decide which method you should choose:
- HTTP(S) is often easier to set up than SSH
- HTTP(S) is the only supported option if you use Git LFS (large file storage)
- Depending on your Git provider and plan, ssh may make it easier to give xltrail more restrictive access rights compared to HTTP(S). For example, GitHub allows you to work with deploy keys that have read-only access to a specific repo—in contrast, their personal access tokens get access to all repositories you have access to.
From the perspective of xltrail, the username/token combination or ssh key is a service account. This means that you will need to handle user permissions explicitly on the side of xltrail as it doesn't take over any existing access rights and users from the external system. For example, when you connect to a private GitHub repo that only you can access, everybody in your xltrail organization will be able to view this repo unless you restrict access on the side of xltrail.
Let's now see how to connect to an existing Git repo by looking at both methods. Let's start with the HTTP(S) method!
Create a Git Project via HTTP(S)
On the landing page, click on the + button:

This will open a dialog from where you can select Git Integration and provide the URL, username and token. If possible, generate a read-only token instead of using your regular password. Follow the instructions below for the most popular Git providers.
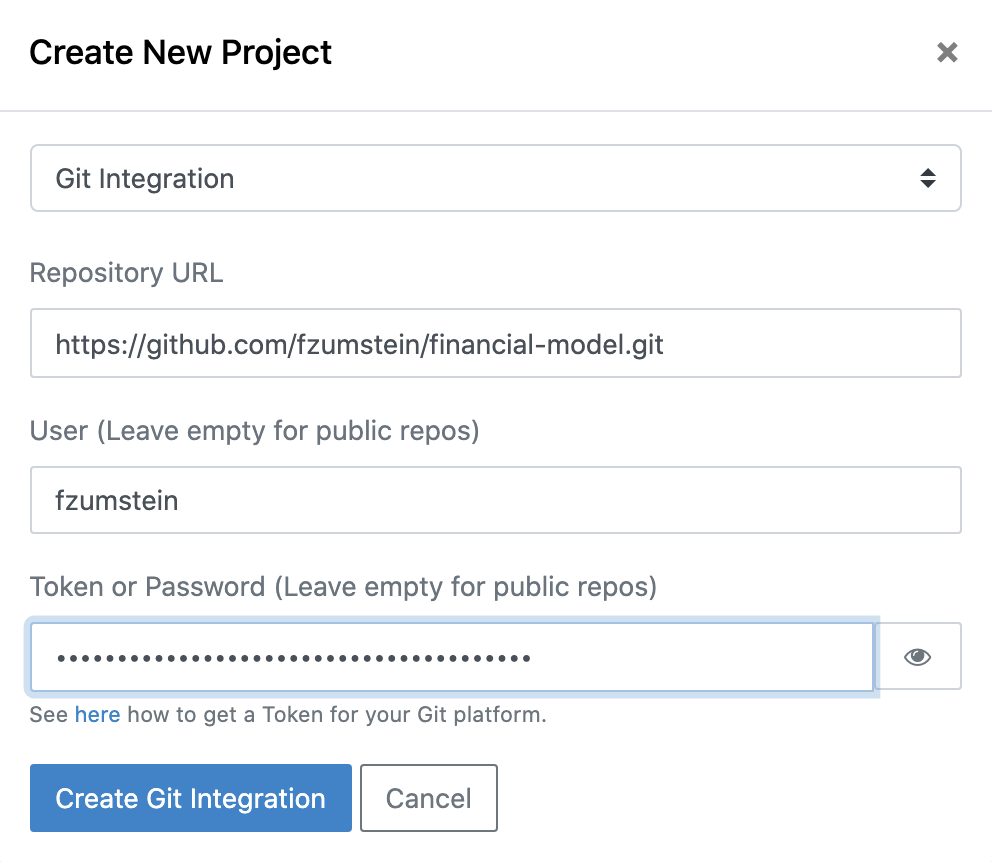
Make sure to paste the HTTP(S) (and not the SSH) version of your Git URL. Also, if your Git provider (e.g. Bitbucket) starts the URL with your username, make sure to remove it including the @. While this should be done automatically by xltrail, it's good to double-check in case your credentials are not accepted.
Depending on the size of your Git repo, the initial syncing may take anything from a few minutes to a few hours: You will be able to check the progress by clicking the History button in the gray bar on the workbook view.
How to Generate Tokens
Depending on the Git provider you use, the tokens may give you access to a single repository or all repositories that your user can access.
Github Cloud & Enterprise
Under Personal settings > Developer settings > Personal access tokens, you can Generate new token. Tick the
repo checkbox so you get access to all the subitems in that box.
If your company is using a Single Sign On (SSO) service like e.g. Okta, you'll need to make sure to enable your token for SAML, see: https://help.github.com/en/github/authenticating-to-github/authorizing-a-personal-access-token-for-use-with-saml-single-sign-on
GitLab Cloud & CE/EE
You can either use a token that is bound to a specific repository or to your user:
Repository Deploy Token
- This requires at least GitLab 10.7
- The token will give you read-only access to a single repository.
- In your repository, go to
Settings>Repository, thenDeploy Tokens(notDeploy Keys!). Give it aName, checkread_repositoryunderScopesand click onCreate deploy token. It will give you both an automatically generatedusernameandtokenthat you'll need to use with xltrail.
Personal Access Token
- You will be able to access every repository that you have access to with a personal access token:
- Create a personal access token under
User Settings>Access Tokens. Tick theread_repositorycheckbox underScopes. Use your GitLab username with that token as password in xltrail. If you are on an older version of GitLab, you might not haveread_repositoryavailable. In that case use theapicheckbox.
Bitbucket Cloud
Personal Accounts: You can create an app password under
Bitbucket Settings>Access Management>App password. Tick the checkboxesRepository (read)andPull Requests (read).Team Accounts: You can create an API key to use with your team name under
Bitbucket Settings>Access Management>API key.
Bitbucket Server
Bitbucket Server (the on-premise version of Bitbucket) introduced personal access tokens with version 5.5, see Bitbucket Cloud above for the details.
On lower versions, you can either use an existing user or create a dedicated xltrail user:
- Log in as Bitbucket administrator
- Under "Administration" click on
Users, thenCreate user - Pick something like
xltrailas the username
To finalize, you need to give this user read access either on Project or Repository level.
Create a Git Project via SSH
Using an SSH key to connect xltrail with your external repository requires three steps:
- Creating your SSH key pair
- Uploading the public key to your Git provider
- Uploading the private key to xltrail
If you use Git LFS, you must use HTTP(S) to connect to your repository, SSH is not supported.
Step 1: Creating your SSH key pair
For the following command, use the Terminal on Linux/macOS or use Git Bash on Windows (Git Bash is part of Git). Run the following command (you can replace xltrail deploy key with anything that helps you remember the purpose of this key:
ssh-keygen -t ed25519 -C "xltrail deploy key"
On older systems, you might need to use rsa instead of ed25519:
ssh-keygen -t rsa -b 4096 -C "xltrail deploy key"
This will first prompt you for the location of the key. In case there is already a file existing at this location, you will be warned. Next, it will ask for a passphrase. Leave this empty (important!) and hit the Enter key. Finally, it will ask to Enter the same passphrase again—hit Enter again without filling in anything.
Next, you will find two files (id_rsa and id_rsa.pub) in the directory that you provided at the beginning.
Step 2: Uploading the public key to your Git provider
Different providers offer different options to add a deploy key. Some providers only allow a key to be used with a user while other providers allow to add a proper "deploy key" to specific repositories or groups of repositories.
GitHub
Inside a repository, click on the tab Settings. Under Deploy keys, you can click the Add deploy key button to upload your public key. You can leave the Allow write access checkbox unchecked.
Azure DevOps
Click on the user icon on the top right, then select Security. On the left side bar, click on SSH public keys
towards the bottom. Click on + New Key on the top right and copy/paste the content of rsa_id.pub into
Public Key Data. Give it a Name like "xltrail deploy key". Make sure that the user you are doing this for has
access to the repositories that you want to sync with xltrail.
Step 3: Uploading the private key to xltrail
On the landing page, click on the + button:
This will open a dialog from where you can select Git Integration and provide your SSH private key under the Token field. For Repository URL, make sure to paste the SSH version of the URL (not the HTTP(S) version) and leave User empty.
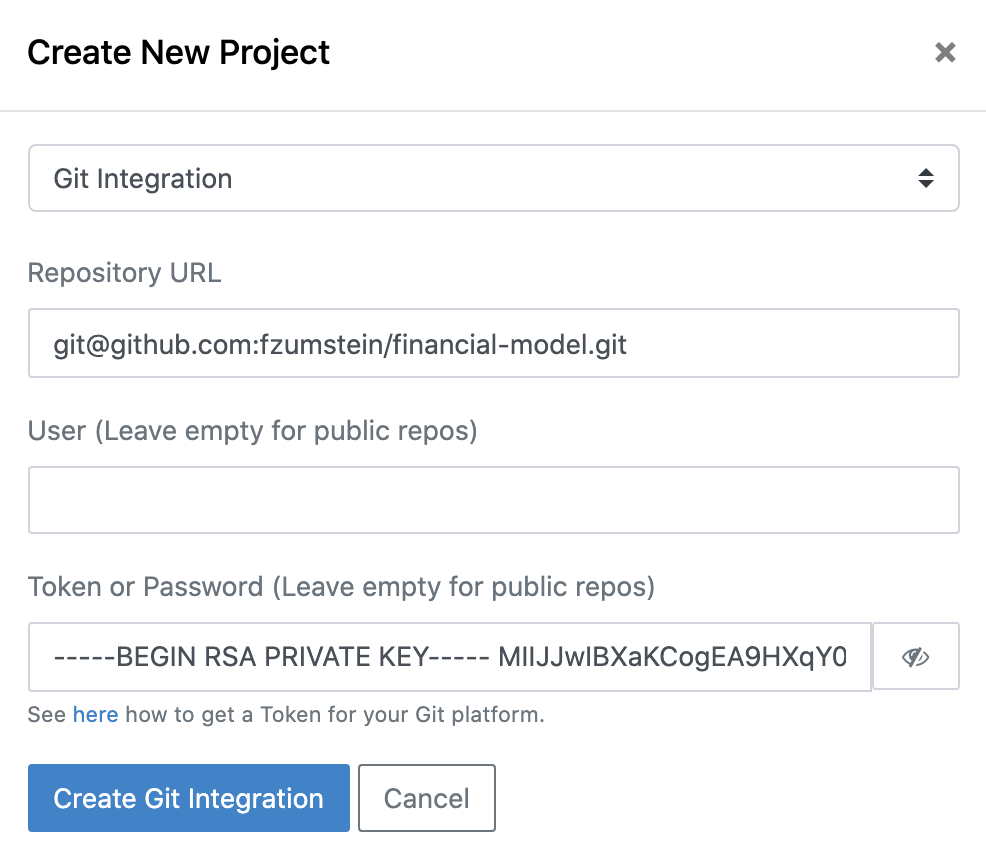
Then, click on Create Git Integration. Depending on the size of your Git repo, the initial syncing may take anything from a few minutes to a few hours: You will be able to check the progress by clicking the History button in the gray bar on the workbook view.
Create a Git Project via File-Based Remote
If you don't want to use an external Git provider like GitHub, self-hosted installations can also use a Git remote directly on the file system:
- Mount the directory with the Git remote as subdirectory of the following path on the xltrail server:
/var/lib/xltrail/integrations/git. Make sure to replace/var/lib/xltrailwith the value of yourDATA_DIRif you have changed that in your config file. - When adding a Git integration, specify
Repository URLas follows:file:///xltrail/integrations/git/<reponame>, leaving user and password empty.
Please restart xltrail after mounting the directory by running
xltrail restartas root.